Adobe Acrobat Reader is among the most popular tools that people use to open PDF documents. Apart from just opening PDF documents, you can get a variety of other purposes completed with the assistance of Adobe Acrobat Reader. Hence, all PC users should think about having this software installed. But if you are using a Chromebook, you will not be able to get Adobe Reader installed in the traditional way. This is where you should understand the specific steps that you will need to follow in order to get Adobe Acrobat Reader on Chromebook. Here is a quick overview of those steps that you should be following.
Contents
How To Install Adobe Acrobat Reader on Chromebook?
There are two methods available for you to get Adobe Acrobat Reader on Chrome OS. The first step would be to download it via Google Play Store. Or else, you can get Adobe Acrobat Reader installed to your Google Chrome web browser as an extension as well. Let’s deep dive and take a look at the two steps on how to get Adobe Acrobat Reader on your Chrome OS.
#1 Method: Using Google Play Store
Step #1:
You should pick the Google Play Store from the launcher and then launch the app.
Step #2:
You can navigate to the search bar in Google Play Store and enter Adobe Acrobat Reader. Then you will be able to locate the app.
Step #3:
Click on the app, get inside and press on the Install button.
Step #4:
Now the app will be installed on your Chromebook. After that, you can use it as any other application.
#2 Method: Using the Google Chrome Extension
If you don’t want to install any apps on your Chromebook, you can pick the Chrome extension method. Here are the steps that you should be following to get the job done.
Step #1:
You should open the Google Chrome browser that is already installed on the Chromebook.
Step #2:
You will then need to get to the address bar and enter Adobe Acrobat Reader. Then you will be able to click on the enter key.
Step #3:
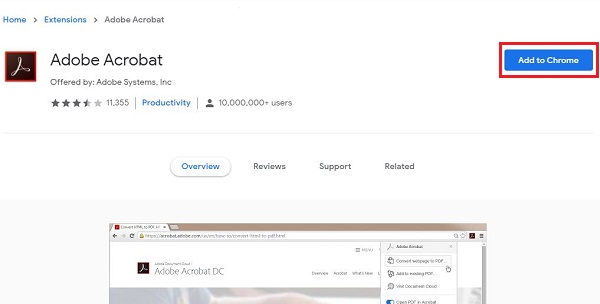
You should open up the Official Web Store link. Then you will be able to access the extension.
Step #4:
Pick the option called Add to Chrome.
Step #5:
Now you will be able to get to the pop-up, which is asking you to Add extension to Chrome.
Step #6:
The extension will be installed on the Google Chrome browser immediately.
Step #7:
Now you will be able to use your Google Chrome web browser on Chromebook to access the PDF files.
Conclusion
It is up to you to pick any of these two methods to get Adobe Acrobat Reader on Chromebook. However, the exact features that you will get would vary based on the option you pick. The updates will automatically get uploaded to the extension, whereas the mobile app updates will only be added if you have selected the option to get them.
Must Read: How to watch Netflix on Chrome OS?